

To be able to run analytics, build reports, or apply machine learning, you need to be sure the data you’re using is clean and in the right format. That’s the data preparation step that requires data analysts and data scientists to write custom code and do many manual activities. First, you need to look at the data, understand which possible values are present, and build some simple visualizations to understand if there are correlations between the columns. Then, you need to check for strange values outside of what you’re expecting, such as weather temperature above 200℉ (93℃) or speed of a truck above 200 mph (322 km/h), or for data that is missing. Many algorithms need values to be rescaled to a specific range, for example between 0 and 1, or normalized around the mean. Text fields need to be set to a standard format, and may require advanced transformations such as stemming.
That’s a lot of work. For this reason, I am happy to announce that today AWS Glue DataBrew is available, a visual data preparation tool that helps you clean and normalize data up to 80% faster so you can focus more on the business value you can get.
DataBrew provides a visual interface that quickly connects to your data stored in Amazon Simple Storage Service (S3), Amazon Redshift, Amazon Relational Database Service (RDS), any JDBC accessible data store, or data indexed by the AWS Glue Data Catalog. You can then explore the data, look for patterns, and apply transformations. For example, you can apply joins and pivots, merge different data sets, or use functions to manipulate data.
Once your data is ready, you can immediately use it with AWS and third-party services to gain further insights, such as Amazon SageMaker for machine learning, Amazon Redshift and Amazon Athena for analytics, and Amazon QuickSight and Tableau for business intelligence.
How AWS Glue DataBrew Works
To prepare your data with DataBrew, you follow these steps:
- Connect one or more datasets from S3 or the Glue data catalog (S3, Redshift, RDS). You can also upload a local file to S3 from the DataBrew console. CSV, JSON, Parquet, and .XLSX formats are supported.
- Create a project to visually explore, understand, combine, clean, and normalize data in a dataset. You can merge or join multiple datasets. From the console, you can quickly spot anomalies in your data with value distributions, histograms, box plots, and other visualizations.
- Generate a rich data profile for your dataset with over 40 statistics by running a job in the profile view.
- When you select a column, you get recommendations on how to improve data quality.
- You can clean and normalize data using more than 250 built-in transformations. For example, you can remove or replace null values, or create encodings. Each transformation is automatically added as a step to build a recipe.
- You can then save, publish, and version recipes, and automate the data preparation tasks by applying recipes on all incoming data. To apply recipes to or generate profiles for large datasets, you can run jobs.
- At any point in time, you can visually track and explore how datasets are linked to projects, recipes, and job runs. In this way, you can understand how data flows and what are the changes. This information is called data lineage and can help you find the root cause in case of errors in your output.
Let’s see how this works with a quick demo!
Preparing a Sample Dataset with AWS Glue DataBrew
In the DataBrew console, I select the Projects tab and then Create project. I name the new project Comments. A new recipe is also created and will be automatically updated with the data transformations that I will apply next.
I choose to work on a New dataset and name it Comments.

Here, I select Upload file and in the next dialog I upload a comments.csv file I prepared for this demo. In a production use case, here you will probably connect an existing source on S3 or in the Glue Data Catalog. For this demo, I specify the S3 destination for storing the uploaded file. I leave Encryption disabled.

The comments.csv file is very small, but will help show some common data preparation needs and how to complete them quickly with DataBrew. The format of the file is comma-separated values (CSV). The first line contains the name of the columns. Then, each line contains a text comment and a numerical rating made by a customer (customer_id) about an item (item_id). Each item is part of a category. For each text comment, there is an indication of the overall sentiment (comment_sentiment). Optionally, when giving the comment, customers can enable a flag to ask to be contacted for further support (support_needed).
Here’s the content of the comments.csv file:
In the Access permissions, I select a AWS Identity and Access Management (IAM) role which provides DataBrew read permissions to my input S3 bucket. Only roles where DataBrew is the service principal for the trust policy are shown in the DataBrew console. To create one in the IAM console, select DataBrew as trusted entity.

If the dataset is big, you can use Sampling to limit the number of rows to use in the project. These rows can be selected at the beginning, at the end, or randomly through the data. You are going to use projects to create recipes, and then jobs to apply recipes to all the data. Depending on your dataset, you may not need access to all the rows to define the data preparation recipe.
Optionally, you can use Tagging to manage, search, or filter resources you create with AWS Glue DataBrew.
The project is now being prepared and in a few minutes I can start exploring my dataset.
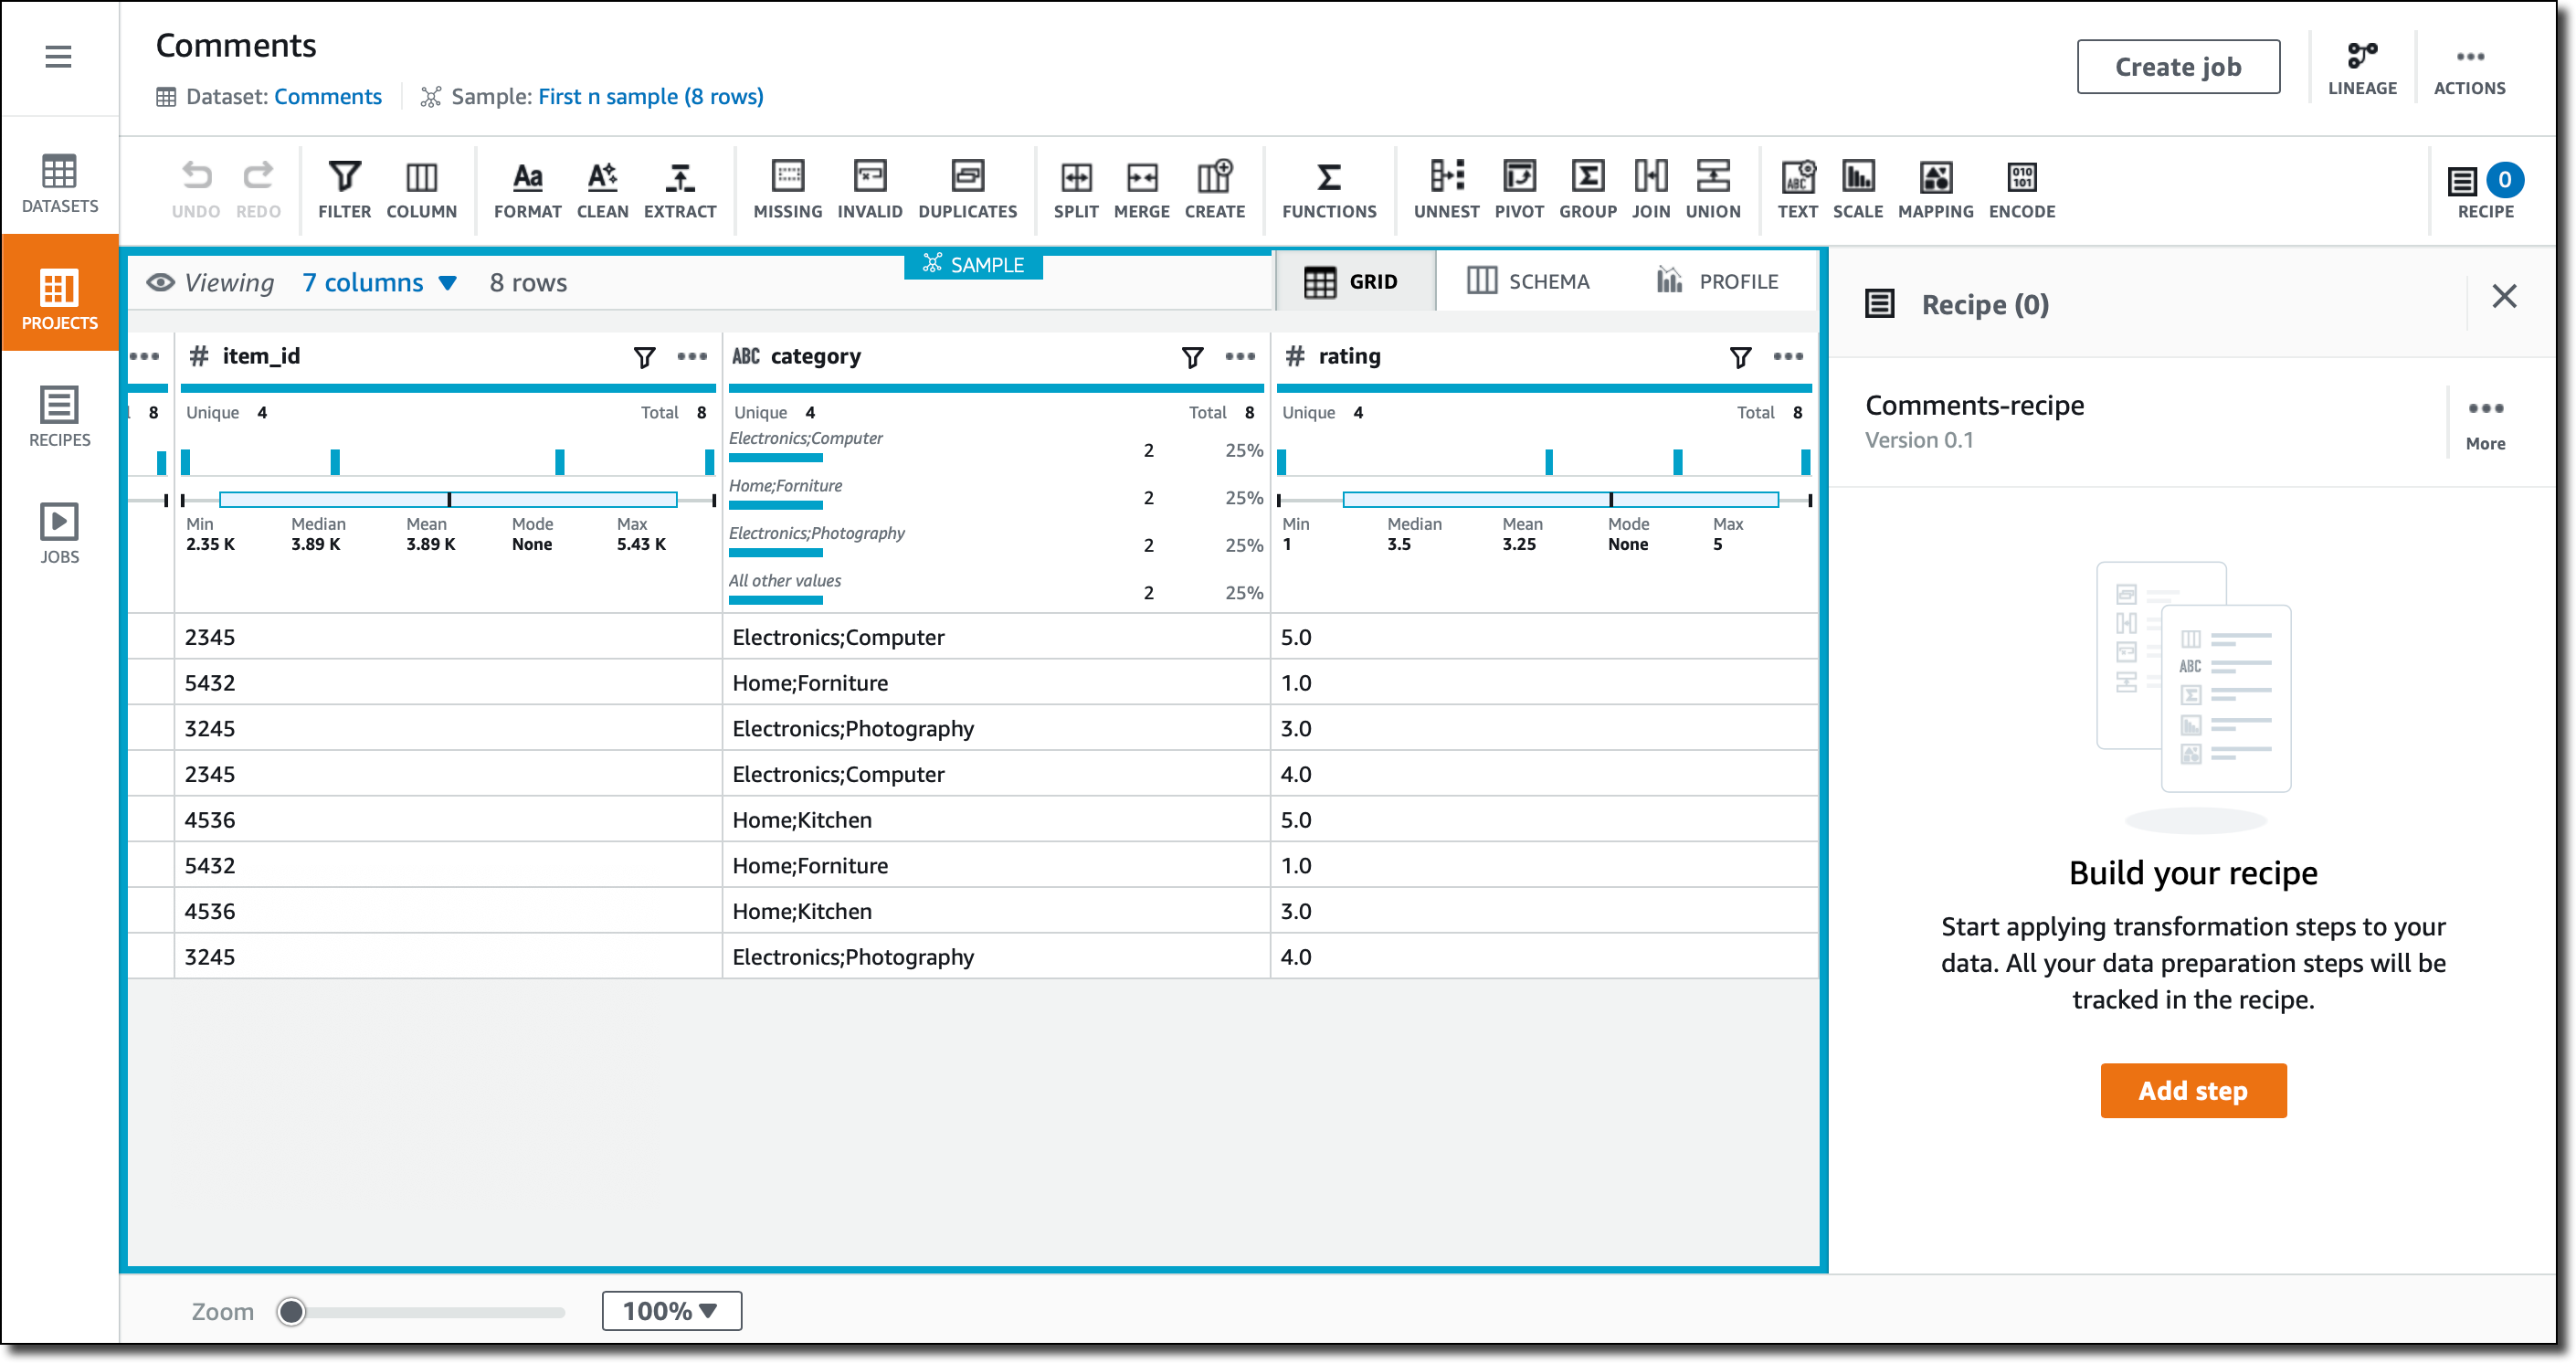
In the Grid view, the default when I create a new project, I see the data as it has been imported. For each column, there is a summary of the range of values that have been found. For numerical columns, the statistical distribution is given.
In the Schema view, I can drill down on the schema that has been inferred, and optionally hide some of the columns.
In the Profile view, I can run a data profile job to examine and collect statistical summaries about the data. This is an assessment in terms of structure, content, relationships, and derivation. For a large dataset, this is very useful to understand the data. For this small example the benefits are limited, but I run it nonetheless, sending the output of the profile job to a different folder in the same S3 bucket I use to store the source data.
When the profile job has succeeded, I can see a summary of the rows and columns in my dataset, how many columns and rows are valid, and correlations between columns.
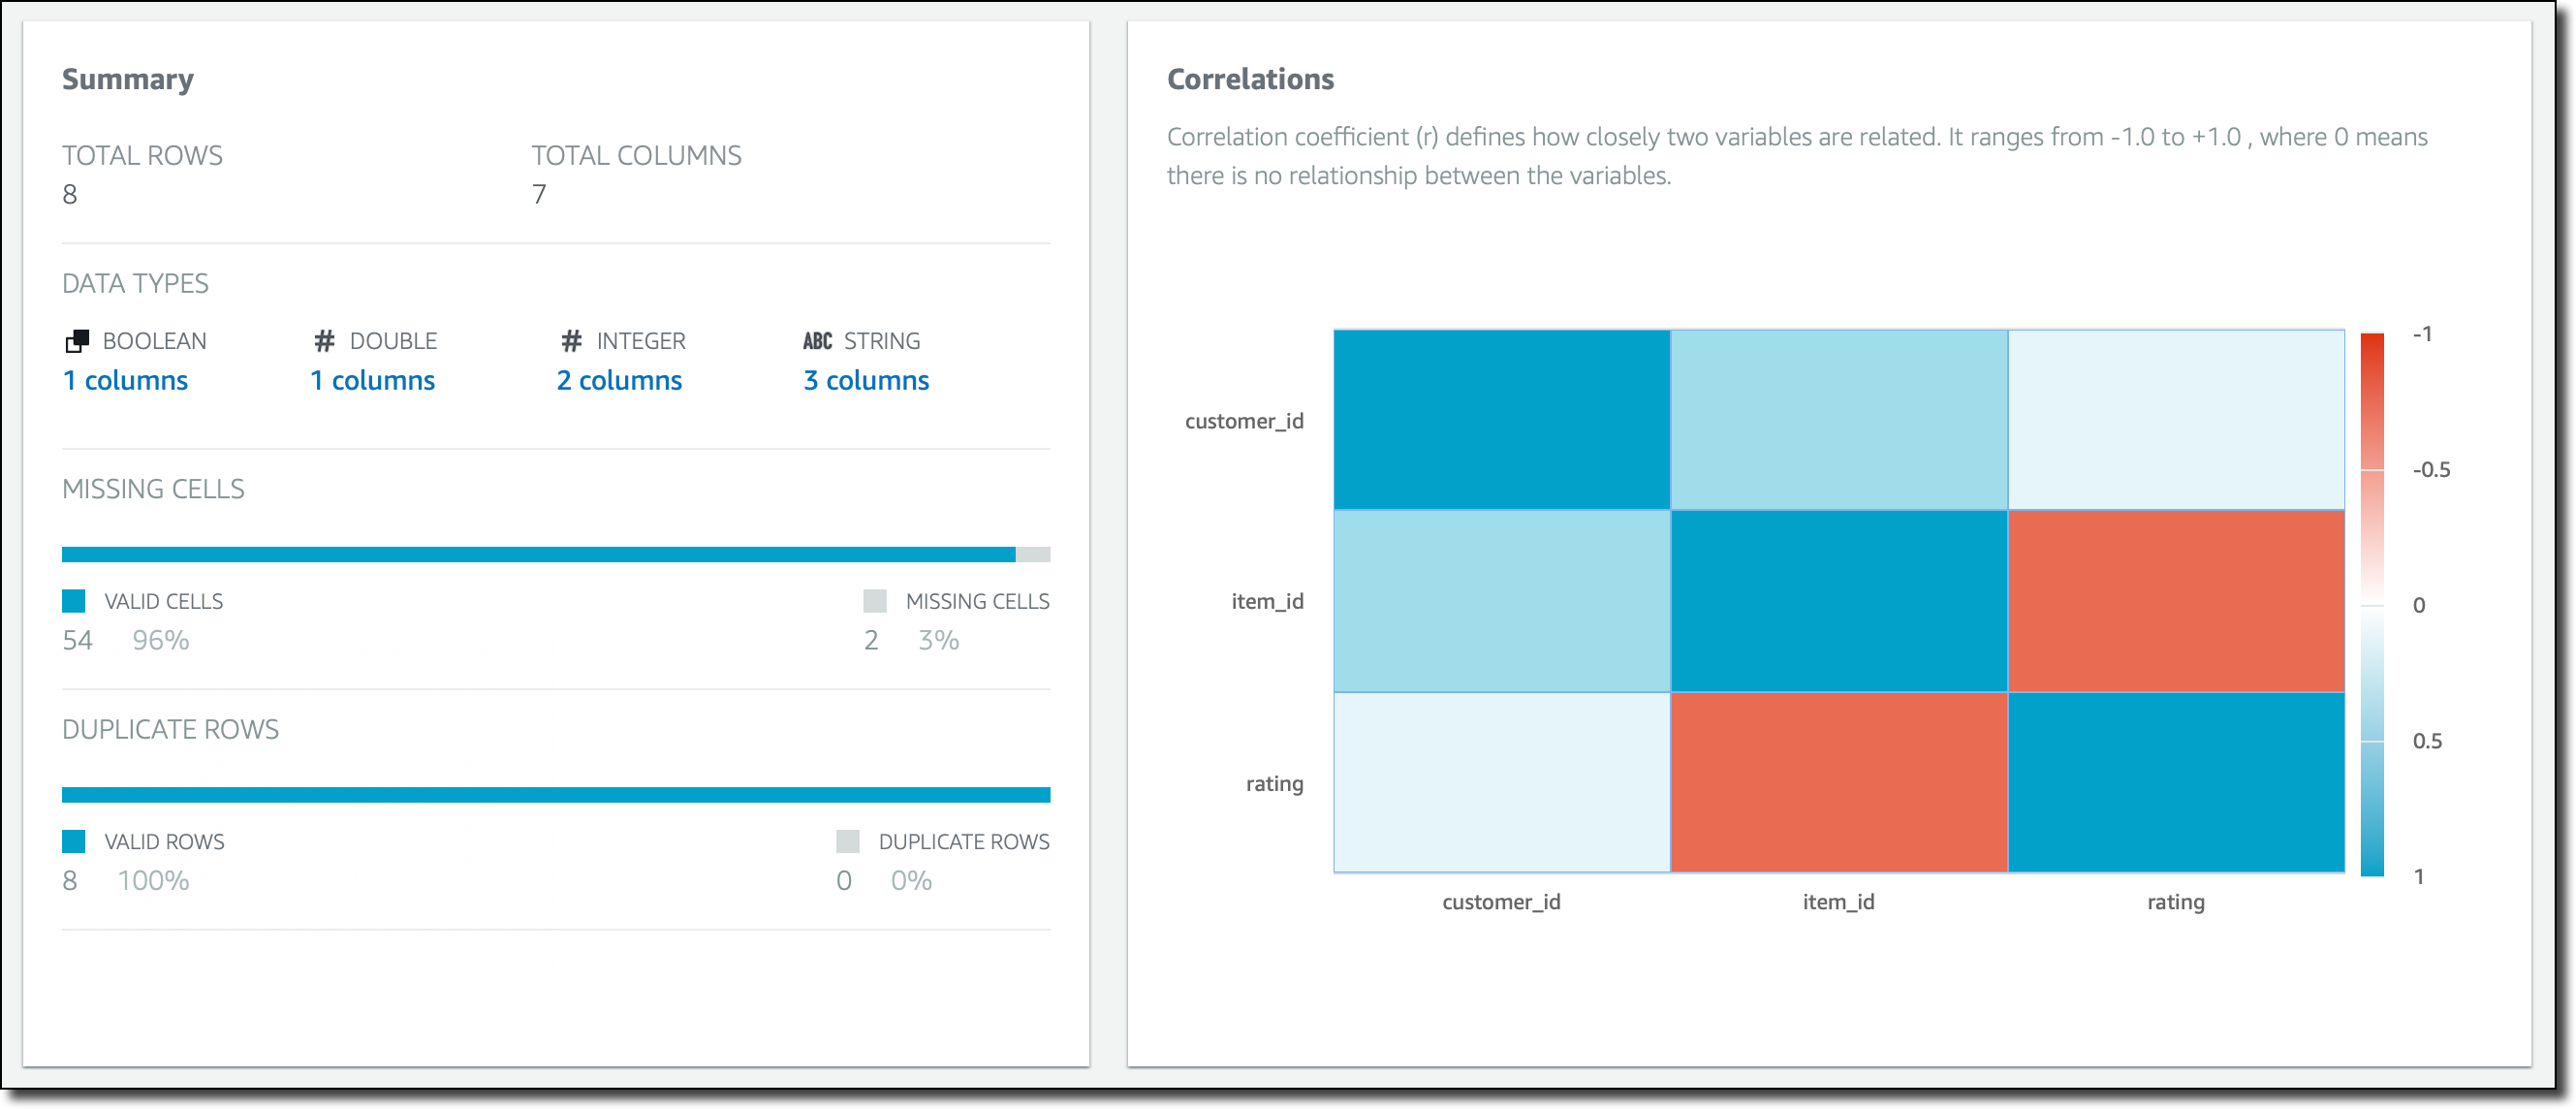
Here, if I select a column, for example rating, I can drill down into specific statistical information and correlations for that column.
Now, let’s do some actual data preparation. In the Grid view, I look at the columns. The category contains two pieces of information, separated by a semicolon. For example, the category of the first row is “Electronics;Computers.” I select the category column, then click on the column actions (the three small dots on the right of the column name) and there I have access to many transformations that I can apply to the column. In this case, I select to split the column on a single delimiter. Before applying the changes, I quickly preview them in the console.

I use the semicolon as delimiter, and now I have two columns, category_1 and category_2. I use the column actions again to rename them to category and subcategory. Now, for the first row, category contains Electronics and subcategory Computers. All these changes are added as steps to the project recipe, so that I’ll be able to apply them to similar data.
The rating column contains values between 1 and 5. For many algorithms, I prefer to have these kind of values normalized. In the column actions, I use min-max normalization to rescale the values between 0 and 1. More advanced techniques are available, such as mean or Z-score normalization. A new rating_normalized column is added.
I look into the recommendations that DataBrew gives for the comment column. Since it’s text, the suggestion is to use a standard case format, such as lowercase, capital case, or sentence case. I select lowercase.
The comments contain free text written by customers. To simplify further analytics, I use word tokenization on the column to remove stop words (such as “a,” “an,” “the”), expand contractions (so that “don’t” becomes “do not”), and apply stemming. The destination for these changes is a new column, comment_tokenized.
I still have some special characters in the comment_tokenized column, such as an emoticon :-). In the column actions, I select to clean and remove special characters.
I look into the recommendations for the comment_sentiment column. There are some missing values. I decide to fill the missing values with a neutral sentiment. Now, I still have values written with a different case, so I follow the recommendation to use lowercase for this column.
The comment_sentiment column now contains three different values (positive, negative, or neutral), but many algorithms prefer to have one-hot encoding, where there is a column for each of the possible values, and these columns contain 1, if that is the original value, or 0 otherwise. I select the Encode icon in the menu bar and then One-hot encode column. I leave the defaults and apply. Three new columns for the three possible values are added.
The support_needed column is recognized as boolean, and its values are automatically formatted to a standard format. I don’t have to do anything here.
The recipe for my dataset is now ready to be published and can be used in a recurring job processing similar data. I didn’t have a lot of data, but the recipe can be used with much larger datasets.
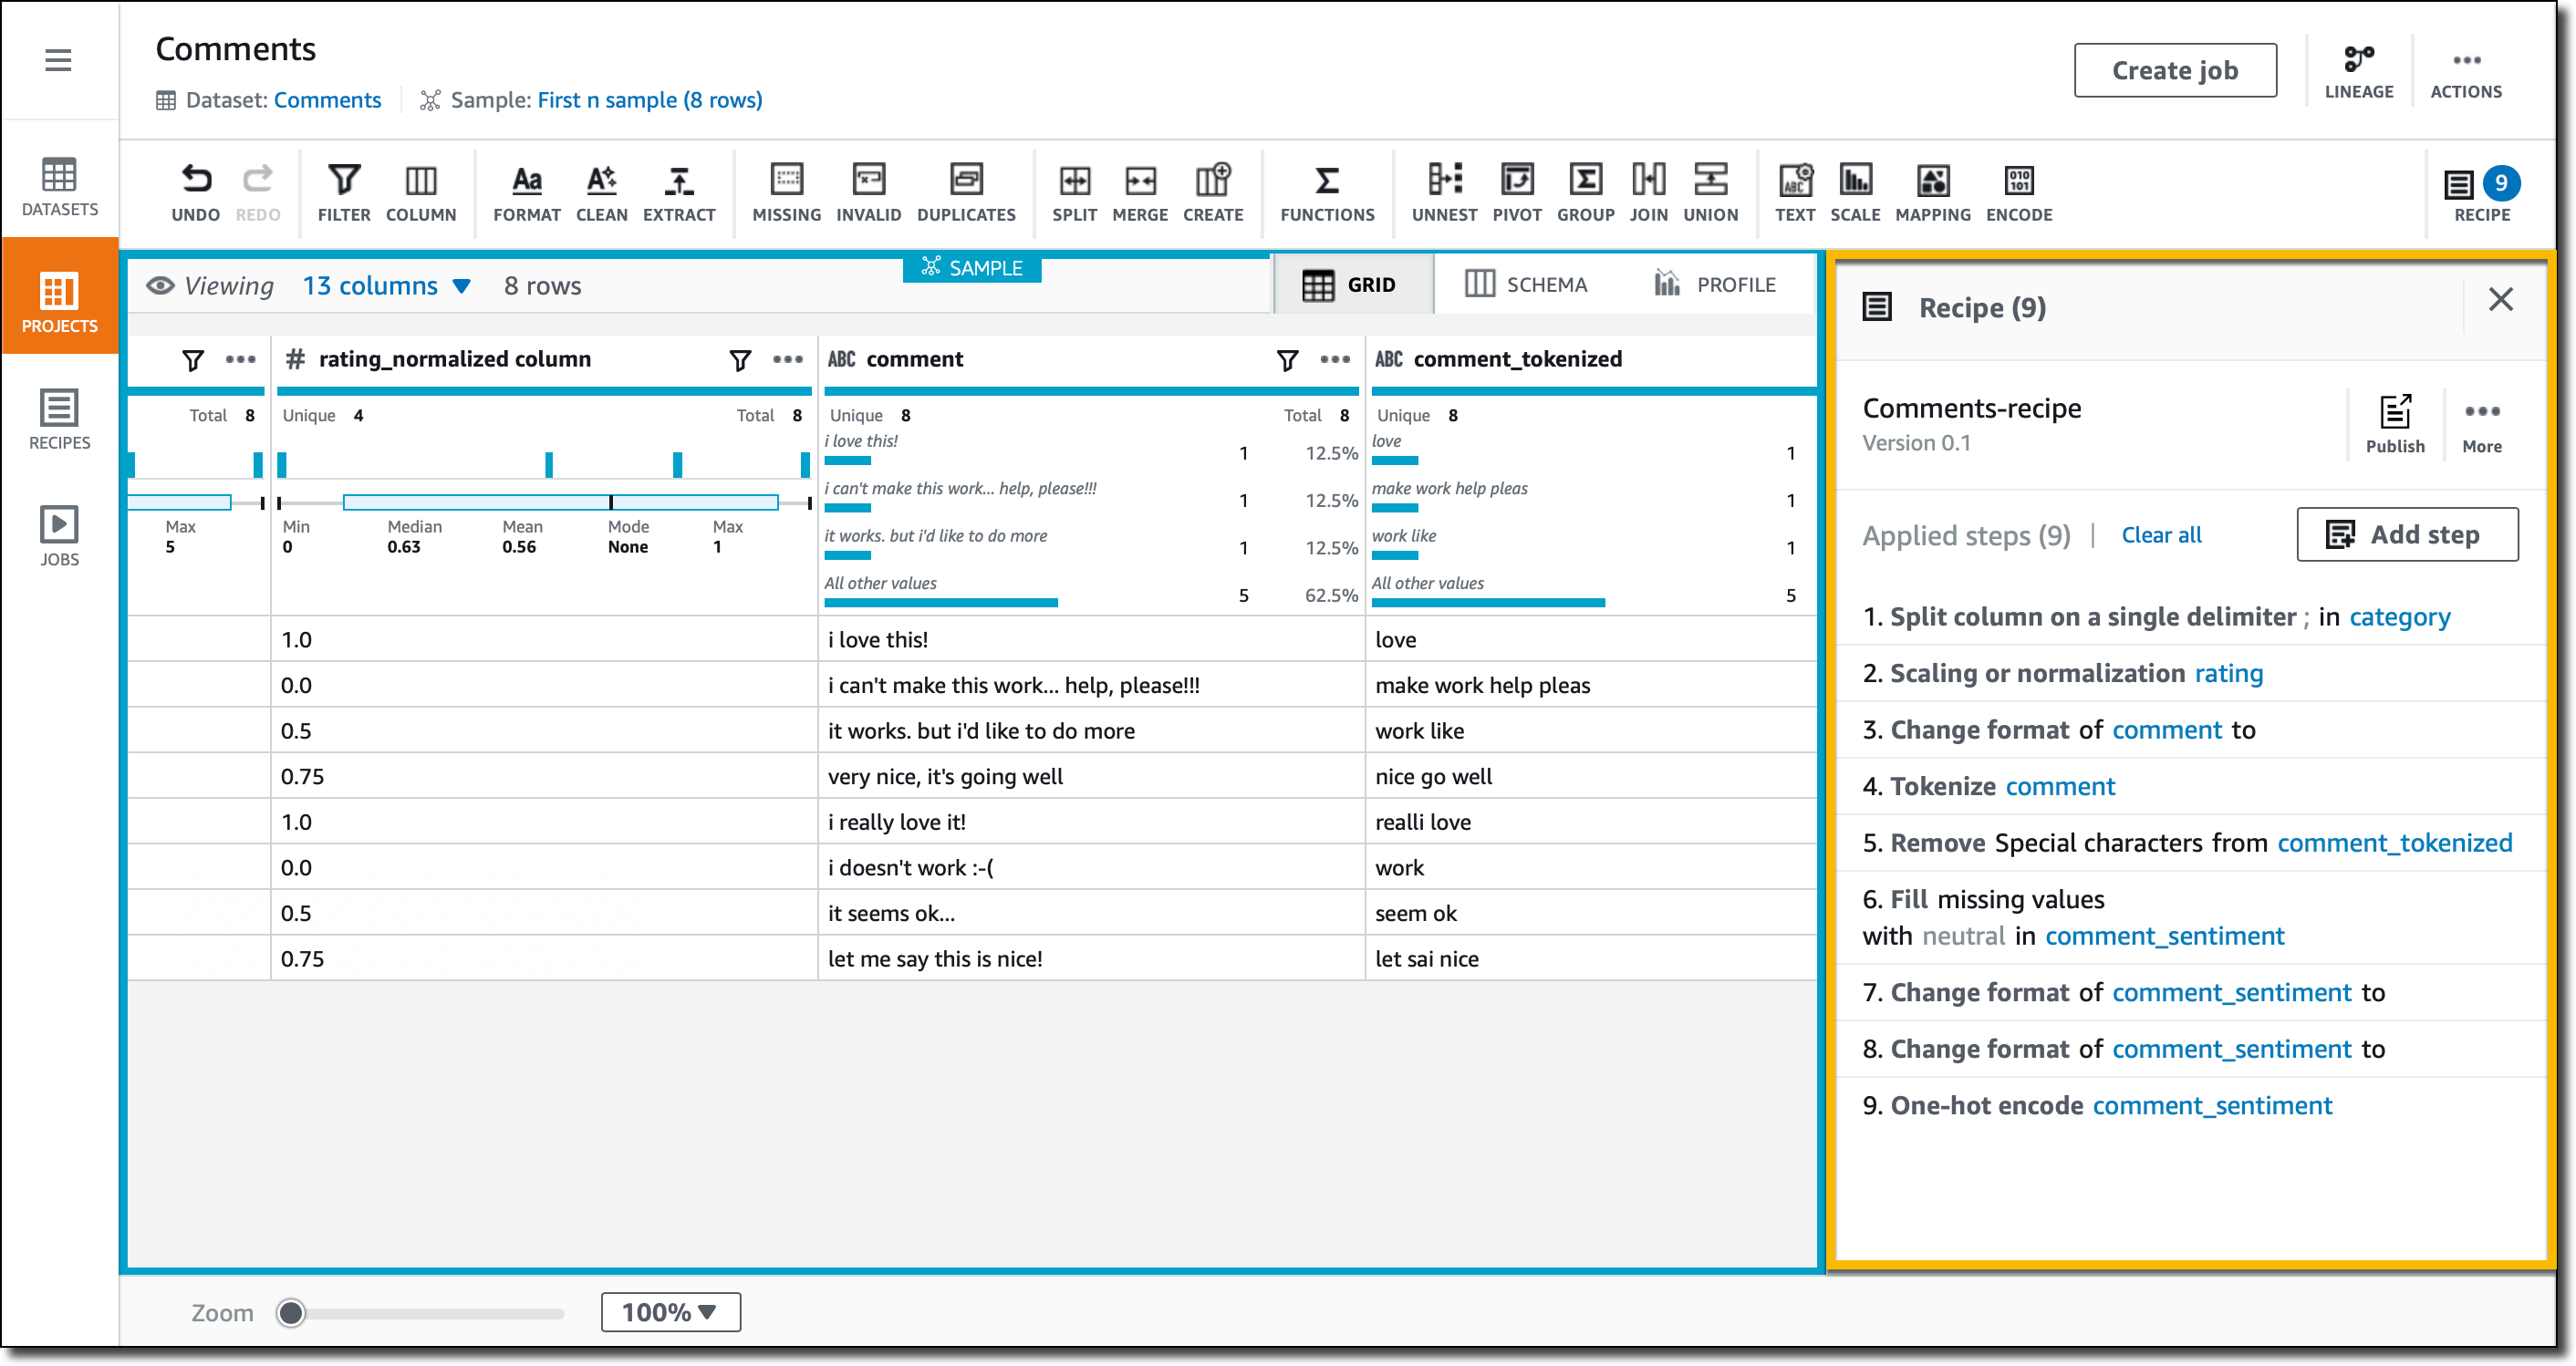
In the recipe, you can find a list of all the transformations that I just applied. When running a recipe job, output data is available in S3 and ready to be used with analytics and machine learning platforms, or to build reports and visualization with BI tools. The output can be written in a different format than the input, for example using a columnar storage format like Apache Parquet.

Available Now
AWS Glue DataBrew is available today in US East (N. Virginia), US East (Ohio), US West (Oregon), Europe (Ireland), Europe (Frankfurt), Asia Pacific (Tokyo), Asia Pacific (Sydney).
It’s never been easier to prepare you data for analytics, machine learning, or for BI. In this way, you can really focus on getting the right insights for your business instead of writing custom code that you then have to maintain and update.
To practice with DataBrew, you can create a new project and select one of the sample datasets that are provided. That’s a great way to understand all the available features and how you can apply them to your data.
Learn more and get started with AWS Glue DataBrew today.
— Danilo


