The Windows Management Instrumentation Command-line (WMIC) utility is a command-line interface (CLI) for working with Windows Management Instrumentation (WMI), a Web-Based Enterprise Management (WBEM) framework for accessing and managing information about Windows computers in enterprise environments.
What is the purpose of WMIC?
The main purpose of WMIC (Wmic.exe) is to provide a user-friendly CLI that allows Windows local system admins to access WMI. WMIC is fully compatible with existing shells and utility commands. Admins can use many prebuilt commands at the WMIC command prompt to do everything from the following:
- Determine what aliases are available for WMIC.
- List all the processes on specified computers where the ProcessID is greater than a certain number.
- Add to the list of nodes from which information is to be retrieved.
- Retrieve properties or call on a defined method.
- Perform specific actions using verbs like Assoc (to show the associations that the Administrators group has with the system), Create (to add a variable with a specific name and set its value to a folder below the Program Files folder), Delete (to delete an environment variable), List (to show data, such as system properties, object status or instance paths), and Get (to return the boot-partition Boolean description string).
Benefits of WMIC
Without WMIC, do-it-yourself systems management with WMI can be very difficult. One reason is that system admins would need to know a programming language like C++ or a scripting language like VBScript to write scripts. These scripts would be needed to gather information by means of WMI. But with WMIC, admins don’t have to write scripts. Instead, they can use the utility on a local machine regardless of WMI namespace permissions to obtain management data from remote computers with WMI.
The WMIC utility also eliminates the need to use WMI-based applications, the WMI Scripting API or tools to manage WMI-enabled computers. It provides a simple and intuitive way, plus batch scripts to extend WMI for operation from several command-line interfaces.
Admins don’t need to understand the WMI namespace to use WMIC. They can use the utility on local machines regardless of WMI namespace permissions. WMIC makes DIY systems management less complex by using aliases. An alias refers to a simple renaming of a class, property or method. Aliases take simple commands entered at the WMIC command line and then act on the WMI namespace in a predefined manner. By functioning as user-friendly syntax intermediaries between the user (admin) and the WMI namespace, aliases in WMIC make it easier for admins to use and read WMI for accessing management information.
How does WMI work?
WMI is Microsoft’s implementation of WBEM — a set of management specifications for defining how resources in enterprise computing environments can be discovered, accessed and manipulated. WMI is also based on the Common Information Model (CIM), a computer industry standard for representing systems, devices, applications and other managed components. The CIM standard lets system administrators and management programs control devices and applications from multiple manufacturers or sources in the same way.
WMI provides users with information about the status of local or remote computer systems and supports the following actions:
- Establish a connection to a remote computer to obtain data about it, such as its domain or currently logged-on user.
- Control hardware or software.
- Get information about a hardware component, such as its properties, presence or state.
- Get information about the hardware state or logical volume of a disk drive.
- Get information about software or operating system, i.e., its version.
- Get event notifications.
- Add a new printer connection for a remote computer.
- Find all the installed hotfixes on a specific computer.
- Back up or clear log files.
- Get event data from NT Event log files.
- Change file or folder properties.
- Create (or modify) registry keys and values.
- Access (or refresh) data about computer performance.
- Create processes and get information related to a running process, such as the account under which it is running.
- Get information about scheduled tasks and implemented services.
The WMIC utility provides an interface to WMI that makes it easy to access information and perform administrative functions. To obtain any of the data listed above, admins can write a script or application in a language like C++, C# or WMI .NET. The other option is to use the WMIC utility, which makes it easy to access WMI for the above tasks. It provides an interface to WMI that makes it easy to access information and perform administrative functions without having to write a script.
To supply data to WMI, admins need to write a WMI COM provider. They can do this with the WMI ATL Wizard in Visual Studio or by using COM directly in any integrated development environment (IDE). A simpler method is to create a managed code provider by using WMI in the .NET Framework.
WMIC modes of operation
WMIC operates in two modes: interactive and noninteractive.
Interactive mode
Users can use WMIC in interactive mode when they first start WMIC. When WMIC starts in interactive mode, the default WMIC role is Rootcli. Once Windows installs the utility on the computer, the user will see the WMIC command prompt, wmic:rootcli>. Then, they can enter a relevant command on one line. After one command runs, the WMIC command prompt will reappear, and the user can insert new comments (again, on one line).
Once in interactive mode, the user can run WMIC commands without specifying the wmic keyword at the beginning of each command. The user remains in this mode until they specifically exit from it by entering the Quit or Exit commands. The interactive mode is most useful if the user needs to enter a series of WMIC commands.
Here’s how to run WMIC in interactive mode:
- Click Start > Run
- Type WMIC
- Press ENTER
- Type the alias, command or global switch that WMIC is to perform.
Noninteractive mode
WMIC can also be used in noninteractive mode. In this mode, the WMIC command prompt disappears after WMIC performs a previously entered command. This mode is useful for carrying out one-off tasks or when including WMIC commands in a batch file (doing this removes the need to retype command sequences in order to repeat common tasks).
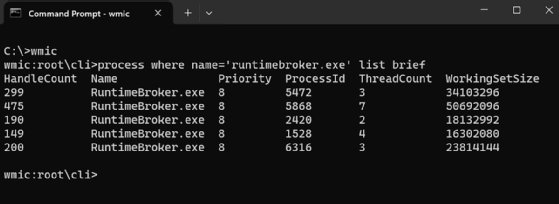
The WMIC interactive mode can be invoked at a Terminal command prompt just like other commands. A user can invoke WMIC noninteractive mode by preceding the WMIC command with the utility’s name. For example, Figure 1 shows a WMIC command at a command prompt in Windows Terminal. This command retrieves information about currently running processes that are named RuntimeBroker.exe.
The command begins with the wmic keyword — the utility’s name — followed by the command body. The body starts with the alias process. Aliases play an integral role in the WMIC utility. They provide friendly names that abstract the more complex underlying logic needed to retrieve WMI information and carry out administrative tasks. In this case, the process alias is used to retrieve a list of specific processes, as qualified by the WHERE option and its name value.
The process alias and its WHERE option are then followed by the verb list, which is one of multiple verbs WMIC supports. A verb carries out some type of action. In this context, the list verb returns information about the specified processes. The verb is also accompanied by the brief option, which tells WMI to return only a subset of the available information about each process.
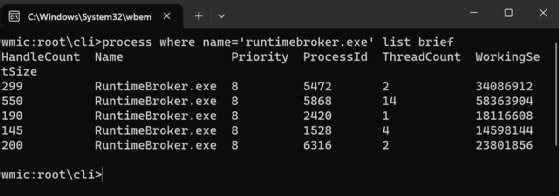
When a user runs a WMIC command in noninteractive mode, they’re returned to the command prompt after the command has completed. However, if they want to work interactively with WMIC, they should type wmic at the command prompt and press Enter. The command prompt changes to wmic:rootcli, as shown in Figure 2.

Here’s how to run WMIC in noninteractive mode:
- Open Command prompt.
- Here, type WMIC.
- Type the command, aliases or global switches WMIC should perform.
- Press ENTER.
Another option for running WMIC is to invoke the utility directly in the Run dialog box. This method is available locally or through a .NET Server Terminal Services session. After the user opens the dialog box, they can type wmic in the text box and click OK. This launches a Terminal window with the WMIC command prompt active, where they can enter commands, as shown in Figure 3.

WMIC commands list
Admins can choose from numerous WMIC commands to easily access and use WMI and the WMI namespace. Commonly used commands include the following:
- CLASS. To escape from WMIC’s default alias mode to directly access classes in the WMI schema.
- PATH. To escape from WMIC’s default alias mode to directly access instances in the WMI schema.
- CONTEXT. To display the current values of all global switches.
- QUIT. To exit from WMIC.
- EXIT. To exit from WMIC.
In addition to commands, WMIC uses global switches, aliases, verbs and Command-line Help. Global switches are settings that apply to the entire WMIC session, aliases are the syntax intermediaries between users and the WMI namespace, and verbs are the specific actions a user wants WMI to take.
Users can get help on individual WMIC elements by using the Command-line Help. Specific characters must be typed at a WMIC command prompt to find specific information. For example, they can review a complete list of aliases and global switches by entering /? or -? at the command prompt, or get information about a specific alias by entering the alias name, followed by /? Similarly,
Is WMIC still used?
Microsoft deprecated the WMIC utility beginning with versions 21H1 of Windows 10 and the 21H1 semi-annual release of Windows Server. It has been superseded by Windows PowerShell for WMI. For that reason, administrators will want to invest their time in PowerShell for WMI. However, they might need to understand WMIC if working with legacy systems or WMIC scripts, in which case, having some knowledge of the utility could be useful.
It’s important to note that only the WMIC utility has been deprecated. WMI remains unchanged and can still be used to obtain management data about managed components like systems, applications, networks and devices. Enterprise admins can also use Windows Management Infrastructure (MI), the next generation of WMI to remotely manage Windows computer systems.
The Windows Command Prompt and PowerShell can perform similar tasks, but their methods might influence users to prefer one over the other.


