What is Linux swappiness?
Linux swappiness is a kernel parameter that determines how aggressively the Linux virtual machine (VM) swaps pages between memory and the swap space on the system’s disk. Users can fine-tune the rate at which a Linux kernel can move pages into and out of active memory using the swappable parameter, which can be set between 0 and 200. The higher the number, the more aggressively the VM swaps data to disk. By default, the swappiness value on most Linux computers is set to 60. The user can change this level to a different setting either temporarily or indefinitely.
A fair amount of confusion surrounds how the swappiness parameter works. Many sources suggest that the parameter determines the percentage of RAM that should be used before swapping pages out of memory. However, this is incorrect. Swappiness is more concerned with balancing memory resources between what’s needed for the file backed page cache and what’s needed for anonymous memory. It’s important to keep the following in mind when setting the swappiness parameter:
- The higher the swappiness value, the more likely Linux is to swap the less active anonymous data from memory to the swap space, whether that space is a partition or file. This commonly includes application data that isn’t backed by files. A higher swappiness level tends to favor workloads that rely more heavily on file data because it preserves the page cache, thereby reducing input/output overhead. But it can also affect the performance of applications that rely heavily on memory.
- The lower the swappiness value, the more likely Linux is to reclaim memory from the page cache and use it for the anonymous data, thus minimizing the need to swap out inactive data. This approach can affect the performance of applications that rely heavily on file data. But it can also improve performance for applications that don’t, especially if they rely on dynamically allocated memory. This approach can also help users when switching between applications because less time is spent waiting for pages to be loaded back into memory.
The Linux platform doesn’t wait until all available memory is used before swapping pages to disk. Instead it swaps pages based on how long they’ve been inactive. Increasing the swappiness value causes the Linux kernel to swap inactive memory pages sooner than when the swappiness parameter is low.
Updating the swappiness parameter
Administrators or users can adjust the swappiness setting on their Linux systems to accommodate specific workloads. They should keep in mind, however, that Linux memory management is a complex process, so they should try out their changes to ensure that performance has improved, rather than gotten worse, before making those changes more permanent which involves updating the sysctl.conf file. Earlier Linux versions supported only 0 through 100 for the swappiness parameter value, rather than 0 through 200.
The process of updating the swappiness parameter is straightforward. But before making any changes, the user should verify the current setting by running the following cat command in the Linux terminal.
cat /proc/sys/vm/swappiness
The cat command — short for “concatenate” — reads the data in the swappiness file and returns the swappiness value. The file is located in the /proc/sys/vm/ directory and contains only this value. In most cases the value is 60 unless the setting has been changed. The following image shows the swappiness file in the /proc/sys/vm/ directory on an Ubuntu system. The file is also open in the system’s text editor, which shows the single value of 60.
The swappiness parameter can be updated either temporarily — until the user restarts the system — or indefinitely by updating the sysctl.conf file. The user can update the parameter temporarily by running the following sysctl command in the Linux terminal.
sudo sysctl vm.swappiness=40
In this case, the sysctl command is preceded by a sudo command, which instructs Linux to temporarily grant the privileges necessary to access system resources. If the sudo command isn’t needed, the user can skip it and go right to the sysctl command, which lets them modify kernel parameters at runtime, including the swappiness parameter. The swappiness parameter name must be preceded by “vm.” — including the period — and the command sets the parameter value to 40.
When the user runs the sysctl command, Linux updates the parameter value and returns the new value to the command prompt, providing a quick confirmation of the change. Linux applies the new value immediately, without requiring the user to restart the system. In fact, the new value is good only until the user restarts the system, at which time, Linux reverts back to the default value or the value specified in the sysctl.conf file.
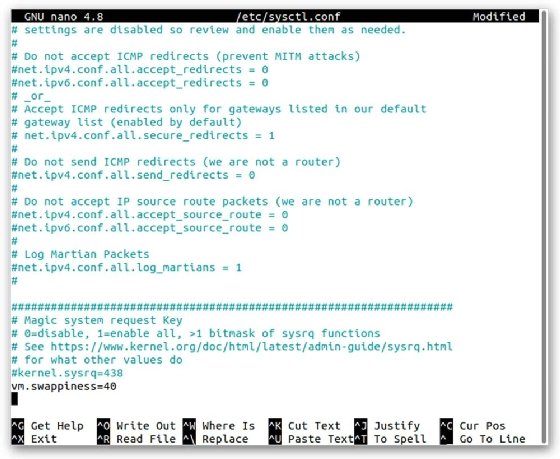
To persist the parameter value indefinitely — that is, until the user wants to change it again – they must manually update the sysctl.conf file. This is done by running the following command.
sudo nano /etc/sysctl.conf
The command calls the nano text editor, which lets the user edit the file directly in the terminal. When the file opens, the user scrolls to the end of the text and adds the following setting.
vm.swappiness=40
In this case, the value is set to 40, but the user can set it to whatever they want between 0 and 200. The system’s terminal should look like the following image, which shows part of the contents of the sysctl file, including the swappiness setting that has been added to the end of the file.

At the bottom of the nano window is a list of options for saving the file and exiting from nano mode. Once the user is satisfied with their changes, they can press Ctrl+O to save the modified file, and then Enter to confirm that they’re saving the file. They can then exit out of nano mode and return to the normal terminal command prompt by pressing Ctrl+X. Linux applies the changes the next time the user restarts the system.
Learn basic terminology to help better understand the Linux operating system.


